ShopDreamUp AI ArtDreamUp


A year later
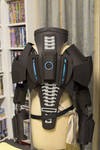
Probably time that I updated this the N7 tutorial has been up long enough.
Since last year let's see.
My sister got married, as did my brother. They've both moved out of home.
Chantel and I decided to split so we could pursue our career ambitions, so she's now working for Microsoft in the States, and I'm a researcher/university tutor in Australia.
Got a crapload of client work, to the point where I'm now full time.
Teaching 3 subjects, ranging from 3D foundations, through to advanced video and product pitching.
Aside from that, been business as usual, just trying to make the world a better place.
What's up with you?
As always
--Wills
A celebration of life
Hello my friends, stalkers and fellow deviants
I know I've been fairly slack on updates and images over the past few years, and I can't promise that will change very much however I felt the need to tell you this.
Yesterday my grandfather turned 90.
A quiet affair for our ever growing family, we looked to celebrate his life with conversation and joy.
My mum made the cake for him, which he enjoyed very much. Particularly the beautiful wildflowers that were created and placed on top.
They are all made of icing, and worth every minute and hour spent carefully handcrafting them.
To a full and happy life, happy birthday Grampa, may your years
So I got a camera
As my "congrats for finishing uni" present to myself, I bought myself a sexy Canon 650D!
Very happy with it, got it for a fantastic price too!
Just looking at playing around with different shots, and shooting things I find interesting.
You may also end up seeing a lot of photos of my cat...
after all, he is ridiculously good looking.
I hope you are all enjoying your holiday season
Best wishes
Your loyal stalker
--Wills
Films and Uni
I know when people tell me I've "bitten off more than I can chew", they generally mean "I don't want to have that workload"...
However with my latest venture, the statement is a little more true than I first realised.
I'll introduce the concept to you:
Construct.
This is a film about a senile inventor's last invention.
This film is supposed to be a story of a mechanical man that's going overcome odds to be almost, but not quite, human.
This was supposed to be my "masterpiece".
I ran into a little problem....
There isn't 6 of me working on this film, there is only 1 of me.
So I'm left with a slightly too large for my mouth assignment,
© 2013 - 2024 AgentWills
Comments14
Join the community to add your comment. Already a deviant? Log In
Hello good, a friend and I are going to start making that costume has in a week, I wonder how long did it take to do it? , That if, depending on the hour that you could do. And you could spend details or any template to perfect it. And one last question, under the costume you wore? Thank you very much for everything. My email is agus_elche18@hotmail.com